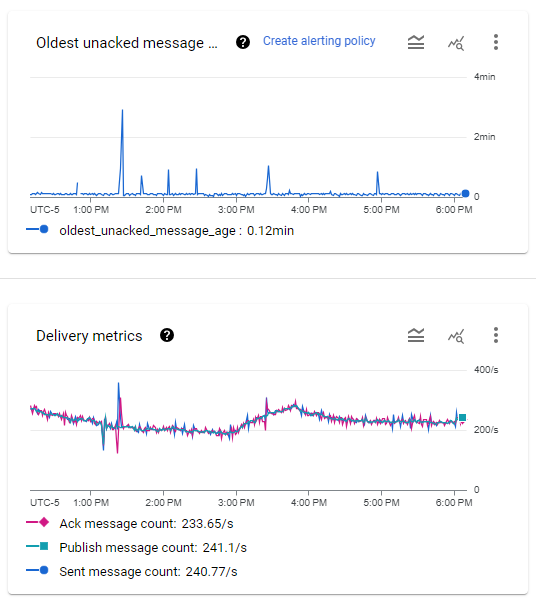
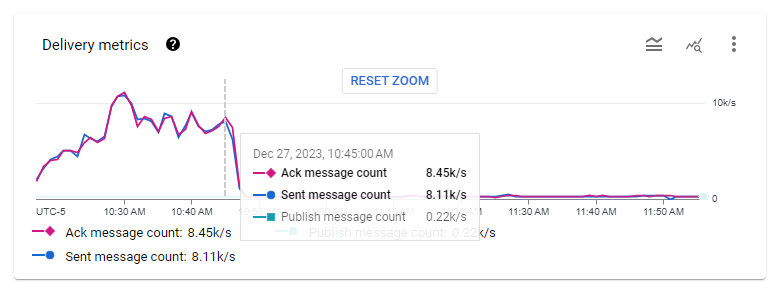
TL;DR: This blog post introduces a cost-effective solution for event streaming that results in up to 18x savings. The solution leverages Cloud Pub/Sub and dlt to build an efficient event streaming pipeline.
The Segment Problem
Event tracking is a complicated problem for which there exist many solutions. One such solution is Segment, which offers ample startup credits to organizations looking to set up event ingestion pipelines. Segment is used for a variety of purposes, including web analytics.
💡 With Segment, you pay 1-1.2 cents for every tracked users.
Let’s take a back-of-napkin example: for 100.000 users, ingesting their events data would cost $1000.
The bill:
- Minimum 10,000 monthly tracked users (0-10K) + $120.
- Additional 1,000 monthly tracked users (10K - 25K) + $12 / 1000 user.
- Additional 1,000 monthly tracked users (25k - 100K) + $11 / 1000 user.
- Additional 1,000 monthly tracked users (100k +) + $10 / 1000 user.
The price of $1000/month for 100k tracked users doesn’t seem excessive, given the complexity of the task at hand.
However, similar results can be achieved on GCP by combining different services. If those 100k users produce 1-2m events, those costs would stay in the $10-60 range.
In the following sections, we will look at which GCP services can be combined to create a cost-effective event ingestion pipeline that doesn’t break the bank.

The Solution to the Segment Problem
Our proposed solution to replace Segment involves using dlt with Cloud Pub/Sub to create a simple, scalable event streaming pipeline. The pipeline's overall architecture is as follows:

In this architecture, a publisher initiates the process by pushing events to a Pub/Sub topic. Specifically, in the context of dlt, the library acts as the publisher, directing user telemetry data to a designated topic within Pub/Sub.
A subscriber is attached to the topic. Pub/Sub offers a push-based subscriber that proactively receives messages from the topic and writes them to Cloud Storage. The subscriber is configured to aggregate all messages received within a 10-minute window and then forward them to a designated storage bucket.
Once the data is written to the Cloud Storage this triggers a Cloud Function. The Cloud Function reads the data from the storage bucket and uses dlt to ingest the data into BigQuery.
Code Walkthrough
This section dives into a comprehensive code walkthrough that illustrates the step-by-step process of implementing our proposed event streaming pipeline.
Implementing the pipeline requires the setup of various resources, including storage buckets and serverless functions. To streamline the procurement of these resources, we'll leverage Terraform—an Infrastructure as Code (IaC) tool.
Prerequisites
Before we embark on setting up the pipeline, there are essential tools that need to be installed to ensure a smooth implementation process.
- Firstly, follow the official guide to install Terraform, a tool for automating the deployment of cloud infrastructure.
- Secondly, install the Google Cloud Pub/Sub API client library which is required for publishing events to Cloud Pub/Sub.
Permissions
Next, we focus on establishing the necessary permissions for our pipeline. A crucial step involves creating service account credentials, enabling Terraform to create and manage resources within Google Cloud seamlessly.
Please refer to the Google Cloud documentation here to set up a service account. Once created, it's important to assign the necessary permissions to the service account. The project README lists the necessary permissions. Finally, generate a key for the created service account and download the JSON file. Pass the credentials as environment variables in the project root directory.
export GOOGLE_APPLICATION_CREDENTIALS="/path/to/keyfile.json"
Setting Up The Event Streaming Pipeline
To set up our pipeline, start by cloning the GitHub Repository. The repository contains all the necessary components, structured as follows:
.
├── README.md
├── cloud_functions
│   ├── main.py
│   └── requirements.txt
├── publisher.py
├── requirement.txt
├── terraform
│   ├── backend.tf
│   ├── cloud_functions.tf
│   ├── main.tf
│   ├── provider.tf
│   ├── pubsub.tf
│   ├── storage_buckets.tf
│   └── variables.tf
Within this structure, the Terraform directory houses all the Terraform code required to set up the necessary resources on Google Cloud.
Meanwhile, the cloud_functions folder includes the code for the Cloud Function that will be deployed. This function will read the data from storage and use dlt to ingest data into BigQuery. The code for the function can be found in cloud_functions/main.py file.
Step 1: Configure Service Account Credentials
To begin, integrate the service account credentials with Terraform to enable authorization and resource management on Google Cloud. Edit the terraform/main.tf file to include the path to your service account's credentials file as follows:
provider "google" {
  credentials = file("./../credentials.json")
  project = var.project_id
  region  = var.region
}
Step 2: Define Required Variables
Next, in the terraform/variables.tf define the required variables. These variables correspond to details within your credentials.json file and include your project's ID, the region for resource deployment, and any other parameters required by your Terraform configuration:
variable "project_id" {
  type = string
  default = "Add Project ID"
}

variable "region" {
  type = string
  default = "Add Region"
}

variable "service_account_email" {
  type = string
  default = "Add Service Account Email"
}
Step 3: Procure Cloud Resources
We are now ready to set up some cloud resources. To get started, navigate into the terraform directory and terraform init. The command initializes the working directory containing Terraform configuration files.
With the initialization complete, you're ready to proceed with the creation of your cloud resources. To do this, run the following Terraform commands in sequence. These commands instruct Terraform to plan and apply the configurations defined in your .tf files, setting up the infrastructure on Google Cloud as specified.
terraform plan
terraform apply
This terraform plan command previews the actions Terraform intends to take based on your configuration files. It's a good practice to review this output to ensure the planned actions align with your expectations.
After reviewing the plan, execute the terraform apply command. This command prompts Terraform to create or update resources on Google Cloud according to your configurations.
The following resources are created on Google Cloud once terraform apply command is executed:
| Name | Type | Description |
|---|---|---|
| tel_storage | Bucket | Bucket for storage of telemetry data. |
| pubsub_cfunctions | Bucket | Bucket for storage of Cloud Function source code. |
| storage_bigquery | Cloud Function | The Cloud Function that runs dlt to ingest data into BigQuery. |
| telemetry_data_tera | Pub/Sub Topic | Pub/Sub topic for telemetry data. |
| push_sub_storage | Pub/Sub Subscriber | Pub/Sub subscriber that pushes data to Cloud Storage. |
Step 4: Run the Publisher
Now that our cloud infrastructure is in place, it's time to activate the event publisher. Look for the publisher.py file in the project root directory. You'll need to provide specific details to enable the publisher to send events to the correct Pub/Sub topic. Update the file with the following:
# TODO(developer)
project_id = "Add GCP Project ID"
topic_id = "telemetry_data_tera"
The publisher.py script is designed to generate dummy events, simulating real-world data, and then sends these events to the specified Pub/Sub topic. This process is crucial for testing the end-to-end functionality of our event streaming pipeline, ensuring that data flows from the source (the publisher) to our intended destinations (BigQuery, via the Cloud Function and dlt). To run the publisher execute the following command:
python publisher.py
Step 5: Results
Once the publisher sends events to the Pub/Sub Topic, the pipeline is activated. These are asynchronous calls, so there's a delay between message publication and their appearance in BigQuery.
The average completion time of the pipeline is approximately 12 minutes, accounting for the 10-minute time interval after which the subscriber pushes data to storage plus the Cloud Function execution time. The push interval of the subscriber can be adjusted by changing the max_duration in pubsub.tf
cloud_storage_config {
    bucket = google_storage_bucket.tel_bucket_storage.name

    filename_prefix = "telemetry-"

    max_duration = "600s"

  }
Our Cost Estimation
On average the cost for our proposed pipeline are as follows:
- 100k users tracked on Segment would cost $1000.
- 1 million events ingested via our setup $37.
- Our web tracking user:event ratio is 1:15, so the Segment cost equivalent would be $55.
- Our telemetry device:event ratio is 1:60, so the Segment cost equivalent would be $220.
So with our setup, as long as we keep events-to-user ratio under 270, we will have cost savings over Segment. In reality, it gets even better because GCP offers a very generous free tier that resets every month, where Segment costs more at low volumes.
GCP Cost Calculation: Currently, our telemetry tracks 50,000 anonymized devices each month on a 1:60 device-to-event ratio. Based on these data volumes we can estimate the cost of our proposed pipeline.
Cloud Functions is by far the most expensive service used by our pipeline. It is billed based on the vCPU / memory, compute time, and number of invocations.
💡 The cost of compute for 512MB / .333vCPU machine time for 1000ms is as follows
| Metric | Unit Price |
|---|---|
| GB-seconds (Memory) | $0.000925 |
| GHz-seconds (vCPU) | $0.001295 |
| Invocation | $0.0000004 |
| Total | 0.0022 |
This puts the monthly cost of ingesting 1 million events with Cloud Functions at:
- (1 million / 60) * 0.0022 cents = $37
In Conclusion
Event streaming pipelines don’t need to be expensive. In this demo, we present an alternative to Segment that offers up to 18x in savings in practice. Our proposed solution leverages Cloud Pub/Sub and dlt to deliver a cost-effective streaming pipeline.
Following this demo requires knowledge of the publisher-subscriber model, dlt, and GCP. It took about 4 hours to set up the pipeline from scratch, but we went through the trouble and set up Terraform to procure infrastructure.
Use terraform apply to set up the needed infrastructure for running the pipeline. This can be done in 30 minutes, allowing you to evaluate the proposed solution's efficacy without spending extra time on setup. Please do share your feedback.
P.S: We will soon be migrating from Segment. Stay tuned for future posts where we document the migration process and provide a detailed analysis of the associated human and financial costs.


